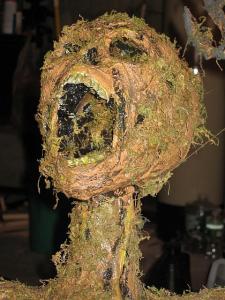
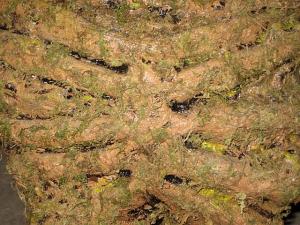
A lifelong fan of Halloween and all things spooky, naturally my first order of business when I moved into my first house was to turn the front yard into a cemetery for the entire month of October. Also, having an appreciation for the works of George A. Romero and Lucio Fulci, I knew no cemetery was complete without the living dead emerging from their graves in an attempt to consume the sweet, sweet high-fructose corn syrup saturated brains of trick-or-treaters. Thus, Gerald.
(Credit for this idea and basic method must be given to Spooky Blue. I consider them a go to resource for Halloween prop building on the internet.)
In all honesty, this project has no rules and you can mess with it until you’re satisfied. Feel free to wing it all you want because you can probably fix whatever you screw up later. These are the materials I used, most of it scrounged from the closet or purchased dirt cheap at Big Lots, Grossman’s Bargain Outlet and Ocean State Job Lot:
- Foam Skull (Whatever quality, it’s just a basic form to work off of.)
- Paper Towels
- Toilet Paper
- White Glue
- Tap Water
- Hot Glue
- Wooden Dowels (Three x 48″)
- Duct Tape
- Newspaper
- Fishing Line
- Craft Wire
- Paper Clips (Two)
- Coat Hangers
- Assorted Discount/Rejected Paint (I hit up Walmart’s paint aisle and discovered they keep a shelf of discounted paint, most of it returned by people who didn’t like the color. Your experience may be different, but pretty much every color I found was spook-worthy; nasty greens, greys, browns and blacks.)
- Base (I used junk pressure treated 2x6s that I screwed together, but you don’t have to seek these out. They create a heavy base and won’t rot, so I guess I was fortunate to have them already, but use whatever you’ve got handy.)
- Clear Sealant
Ok, I know it’s a long list, but if you look over it again you’ll realize it’s pretty much all stuff you’ve already got lying around. What actually went in to the end product couldn’t have cost more than $15, a third of that being in the foam skull. Here’s some tools:
- Large Bowl
- Drill
- Scissors
- Wire Cutters
- Sharpie
- Serrated Steak Knife (Snag this when your significant other is shopping or something.)
- Assorted Paint Brushes (Visit a discount store and you’ll find giant multi-packs for pennies. You’ll just throw them out when you’re finished anyway.)
- Hot Glue Gun
- Munchos (Who eats these things anyway? I tried them, once, and they didn’t taste any better than those biodegradable corn-based foam packing peanuts, the ones you get from hippie eBay merchants, if you sprayed them with butter flavored Pam and then rolled them in Kosher salt. I swear Frito-Lay does their food research in a hot-boxed college dorm room. Anyway, the point is you might want some snacks. Good snacks. And booze. As Pablo Picasso once said, “A good wine reveals the person, but a great great wine reveals the artist.” Personally, I think that’s bull, mainly because I just made it up, but take from it what you will because you are now an artist. An artist of death. Munchos.)
1. This guy looks too happy to be dead. The first thing I did was to sketch a line to cut along with the steak knife (a perfect styrofoam saw) to remove the lower jaw. If you want you can just stop here, throw the skull out on your lawn and call it a night. That’s obviously what the manufacturer intended.

Jaw Line
2. I then reattached the jaw with the paperclips, bent into a U shape. Position it to give the impression of a screaming skull, then cover the area with hot glue to lock it in.

Screaming Skull
3. Next up is creating the basic framework for the corpse’s body. I cut one of my wooden dowels down to roughly 36″, long enough to represent the torso and neck with enough excess to mount the skull to the top and base to the bottom. This project is technically called a “groundbreaker,” meaning it is only a partial body that will look as though it is emerging from the earth. I bent some coat hangers and affixed them with plenty of duct tape for the rib cage. You may want to consider some basic anatomy to get this right, but in the end it’s a living corpse so being a little off will only add to the effect.

Body Framework
4. I wrapped the coat hangers with newspaper and duct tape to flesh out the body a bit, and also added an inverted coat hanger to the back for the shoulders and scapulae. (Nice word!)
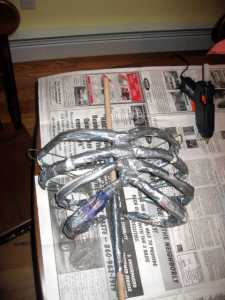
Filling Out
5. Finally, we can stand Gerald up. Here is where you can really start to see the whole project take shape. I drilled a hole in the base and inserted the dowel with a little glue, and I also drilled a hole into the bottom of the foam skull to glue it to the top. This doesn’t take much with a high powered drill, so go easy. Position the skull at a bit of an angle to add a little more animation to your creature.

Stand Up Gerald!
6. I cut my two remaining dowels in half to create the arms. The right arm is inserted into a hole I drilled into the base at an angle which not only results in the illusion that Gerald is supporting himself on the ground, but also adds stabilization to the entire piece.The elbows were created by drilling small holes through the ends of the dowels, then looping craft wire through them and wrapping it around like crazy. I wanted the left arm to appear as though it is clawing through the air, and found it necessary to tie it back to the neck with high test fishing line to keep it stable.
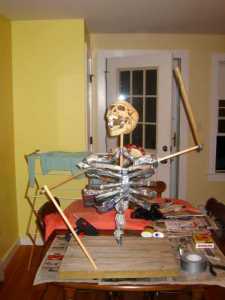
Armaments
7. Next is to papier mache the crap out of this guy. I tore up paper towels and soaked them in a mixture of white glue and water, then stuck them to the framework. The arms were fleshed out with newspaper and duct tape, and the body was stuffed with more newspaper. You’ll probably want paper towels with as little texture as possible, though in the end it didn’t matter so much with paint and Gerald showing his stuff in the dark. The paper towels can be rolled into cords to create nasty flesh effects, and toilet paper can be applied to smooth out the body or add finer wrinkles and gore. Take your time, cover everything, and wait for it to dry. (Some people use Monster Mud instead of glue and water for this step. It probably works better. I didn’t feel like doing it.)

Skinned
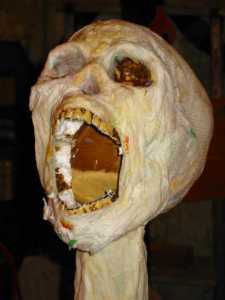
8. Here’s a more detailed shot of how I fleshed the head. You can see how I carved the mouth out a bit and mushed the teeth around. Other notable components were cords of paper towel to make the brow line, eye sockets and cheek bones pop, and sheets of towel to create decaying cheeks. On the left you can see a little bit of toilet paper for some hanging flesh. Do this liberally.
Head Shot
9. This is my framework for the hands. I hot glued pieces of coat hanger to a piece of cardboard, all of which I bent and molded around my own hand. I affixed them to the apporpriate points on Gerald with glue and wire, then also fleshed them out with the aforementioned method.

High-Five
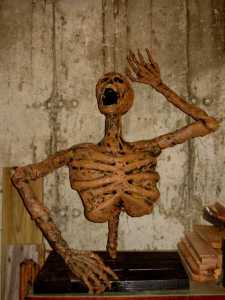
10. The final step is to paint and seal your new friend. I can’t tell you what to do here, just keep covering him with paint until you’re happy with the results. If you make a “mistake,” just try again. The only tip I can offer is to fill in the recessed areas with dark paint, and dry brush over the top with whatever you’ve got to add depth and texture. I also used a rejected “gangrene” paint that I can’t ever see anyone using in their home to add a toxic, oozey effect. Over the top I unloaded a can of clear, poly sealant. Truthfully, I probably used the wrong stuff. Gerald got a little damp Halloween night and the sealant turned kind of cloudy, so make sure you have no holes and you use something better than I did, possibly multiple coats of polyurethane. (Any suggestions for next year would be appreciated, though Gerald dried out fine in the end.)
Gerald

Riiicolaaa

Flesh
11. Finally, here is Gerald in all his glory (sans lighting and fog). The base is hidden with dead leaves to add to the groundbreaker effect. It’s a fairly modest display in the world of home haunts, but it’s my first effort and I plan on adding more handmade props over time which I’ll be sure to share here on DIY HARD.

Come Get Some
Like I’ve suggested, this is a total MacGyver project. Scrape together all the junk you can find and let your imagination take over! There are no mistakes here, and most often they will become the best features.


